A teacher’s guide to setting up payouts with Stripe
The Daris Team · 7 June 2026 · 6 min read
Teaching from Egypt, Jordan, Morocco, or Pakistan? Payouts work a little differently in your country — read our guide to getting paid there instead.
Before you can publish a course and start earning on Daris, you need to set up payouts. We use Stripe to verify your identity and send your earnings to your bank — the same system used by millions of businesses worldwide. The form Stripe shows can feel a bit bureaucratic the first time, so this guide walks you through it step by step and flags the bits that trip teachers up.
Why this step exists
Daris pays real money into your bank account, so by law we (through Stripe) have to confirm who you are and where the money should go. This is called KYC(“know your customer”). Until it’s complete, your courses stay as drafts and students can’t book you. Once it’s done, you’re cleared to publish and get paid — you only have to do it once.
Before you begin
Have these to hand so you can finish in one sitting:
- Your legal name, exactly as it appears on your government ID.
- Your date of birth and home address.
- A government-issued photo ID — passport, driving licence, or national ID. You may be asked to photograph it (and sometimes take a quick selfie).
- Your bank account details for payouts (account number and sort code/routing number, or IBAN, depending on your country).
- Your phone number and email for verification codes.
The single most common cause of delays is a mismatch: the name and address you type must match your ID and bank account. Copy them exactly — no nicknames, no abbreviations.
Step by step
1. Start payouts setup
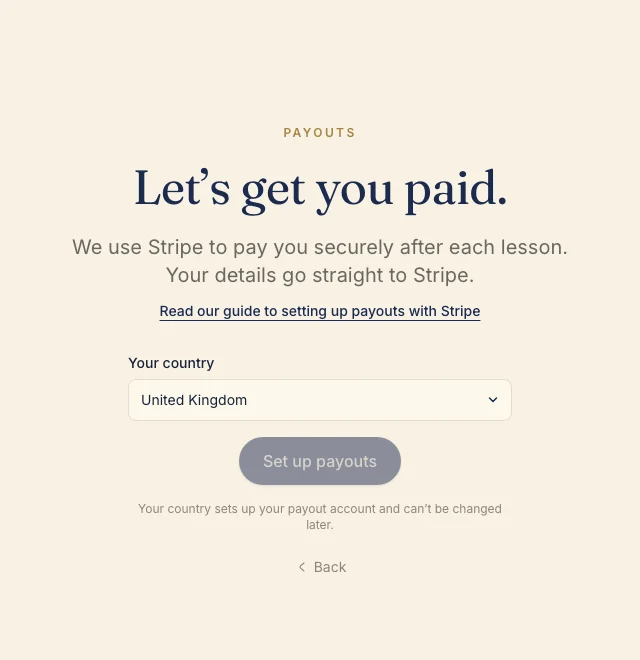
The easiest entry is the Payoutsquestion in your guided onboarding — if you skipped it, you’ll find the same setup on the Payouts card of your profile page and in your dashboard checklist. Pick the country where your bank account is held — this can’t be changed later, so choose carefully — then choose Set up payouts.
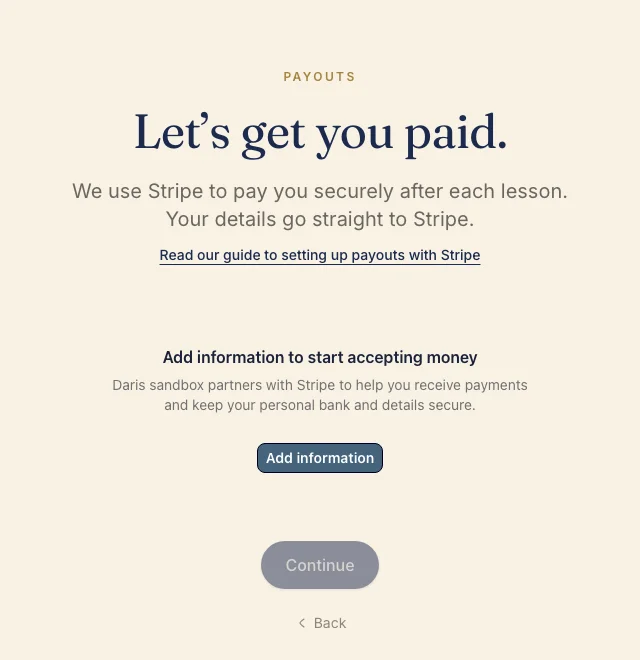
Stripe’s secure form loads right there on the page. Choose Add information to begin — depending on your browser it either continues in place or opens a dedicated Stripe window. Either way, your details go to Stripe, never to Daris.
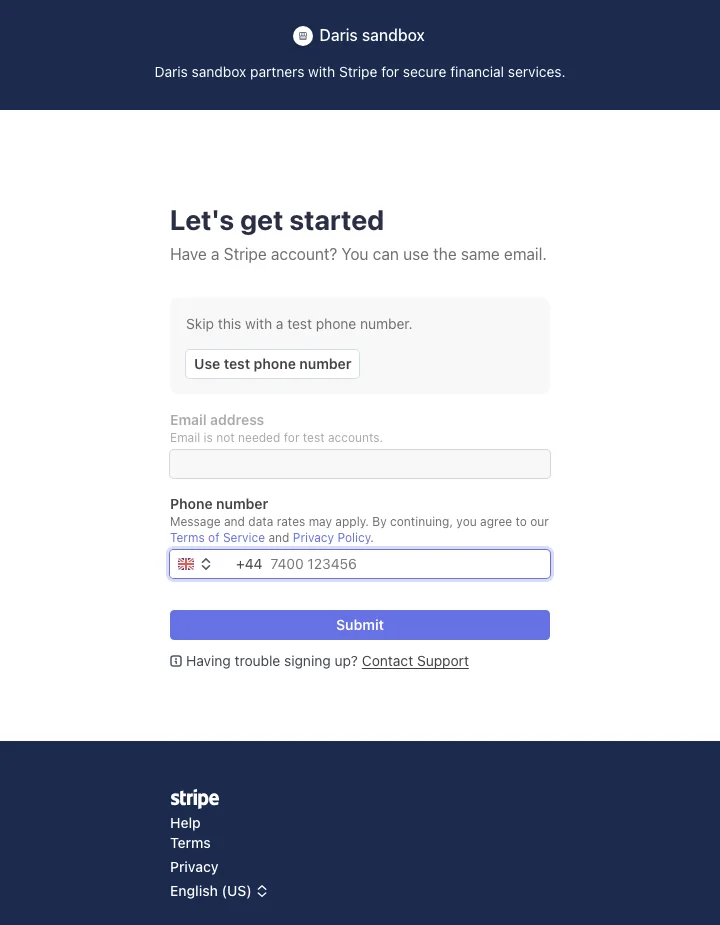
2. Create your Stripe sign-in
Stripe first asks for your email address and phone number and texts you a short code to confirm the phone. This becomes your sign-in for checking payouts later, so use a number you keep.
3. Tell Stripe what kind of account you are
Most teachers are an Individual (a sole person teaching), not a registered company. Choose Individual unless you genuinely operate as a business — it asks for less information.
4. Enter your personal details
Name, date of birth, address, phone, and email. Stripe may send a verification code to your phone or email — keep them nearby. Again: match your ID exactly.
5. Tell Stripe about your work (industry and website)
Stripe asks for an industry and a website. For the industry, “Education — other”fits 1:1 teaching well. If you don’t have a website, look for the small “Don’t have a website?” link beneath the website field — click it and instead write a sentence or two about what you do, for example “I’m a teacher of [your subject], offering 1:1 video lessons to students on Daris.”
6. Verify your identity
Stripe will usually try to verify you automatically. If it can’t, it asks you to upload a photo of your ID and, in some countries, to take a short selfie so it can confirm the photo is really you. Use good lighting and make sure all four corners of the document are visible and the text is sharp.
7. Add your bank account
This is where your earnings land. Enter the account in the same currency and country you selected at the start. Double-check every digit of the account and sort code/routing number — a wrong digit is the most common reason a payout fails later.
8. Review and submit
Stripe shows a summary. Read it, fix anything highlighted, and submit. You’ll be returned to Daris automatically.
“In review” — what happens next
After you submit, your status shows In review while Stripe runs its checks. This is often instant but can take a little while. When it finishes, your Payouts card flips to Connectedand you’re ready to publish. If it hasn’t updated after a few minutes, tap the small refresh icon on the Payouts card to re-check.
If Stripe asks for more information
Sometimes Stripe needs an extra document or a correction — for example, if your ID was blurry or a detail didn’t match. Your status will say Action required. Open the Payouts card on your profile again and choose Continue setup; supply exactly what’s asked for and re-submit. It’s routine, not a rejection.
Common fixes:
- Name mismatch: make sure it matches your ID character for character.
- Address mismatch: use your current residential address, not a P.O. box.
- Unreadable ID photo: retake it in better light, flat and in focus.
- Bank details rejected: confirm the account is in the right country and currency and that every digit is correct.
When you’re verified
Once your status is Connected, you can publish your courses and accept bookings. When a lesson is completed, the payment is captured and your share is sent to your connected account; Stripe then pays it out to your bank on its normal schedule. You can review or update your details any time from the Payouts card.
Stuck on a step? Use the feedback button in the bottom-right corner of any page and we’ll help you through it. Welcome to Daris — we’re glad you’re teaching with us.